Iphone Tips and Tricks | Iphone tips | Iphone Tips and Tricks 2022/2021
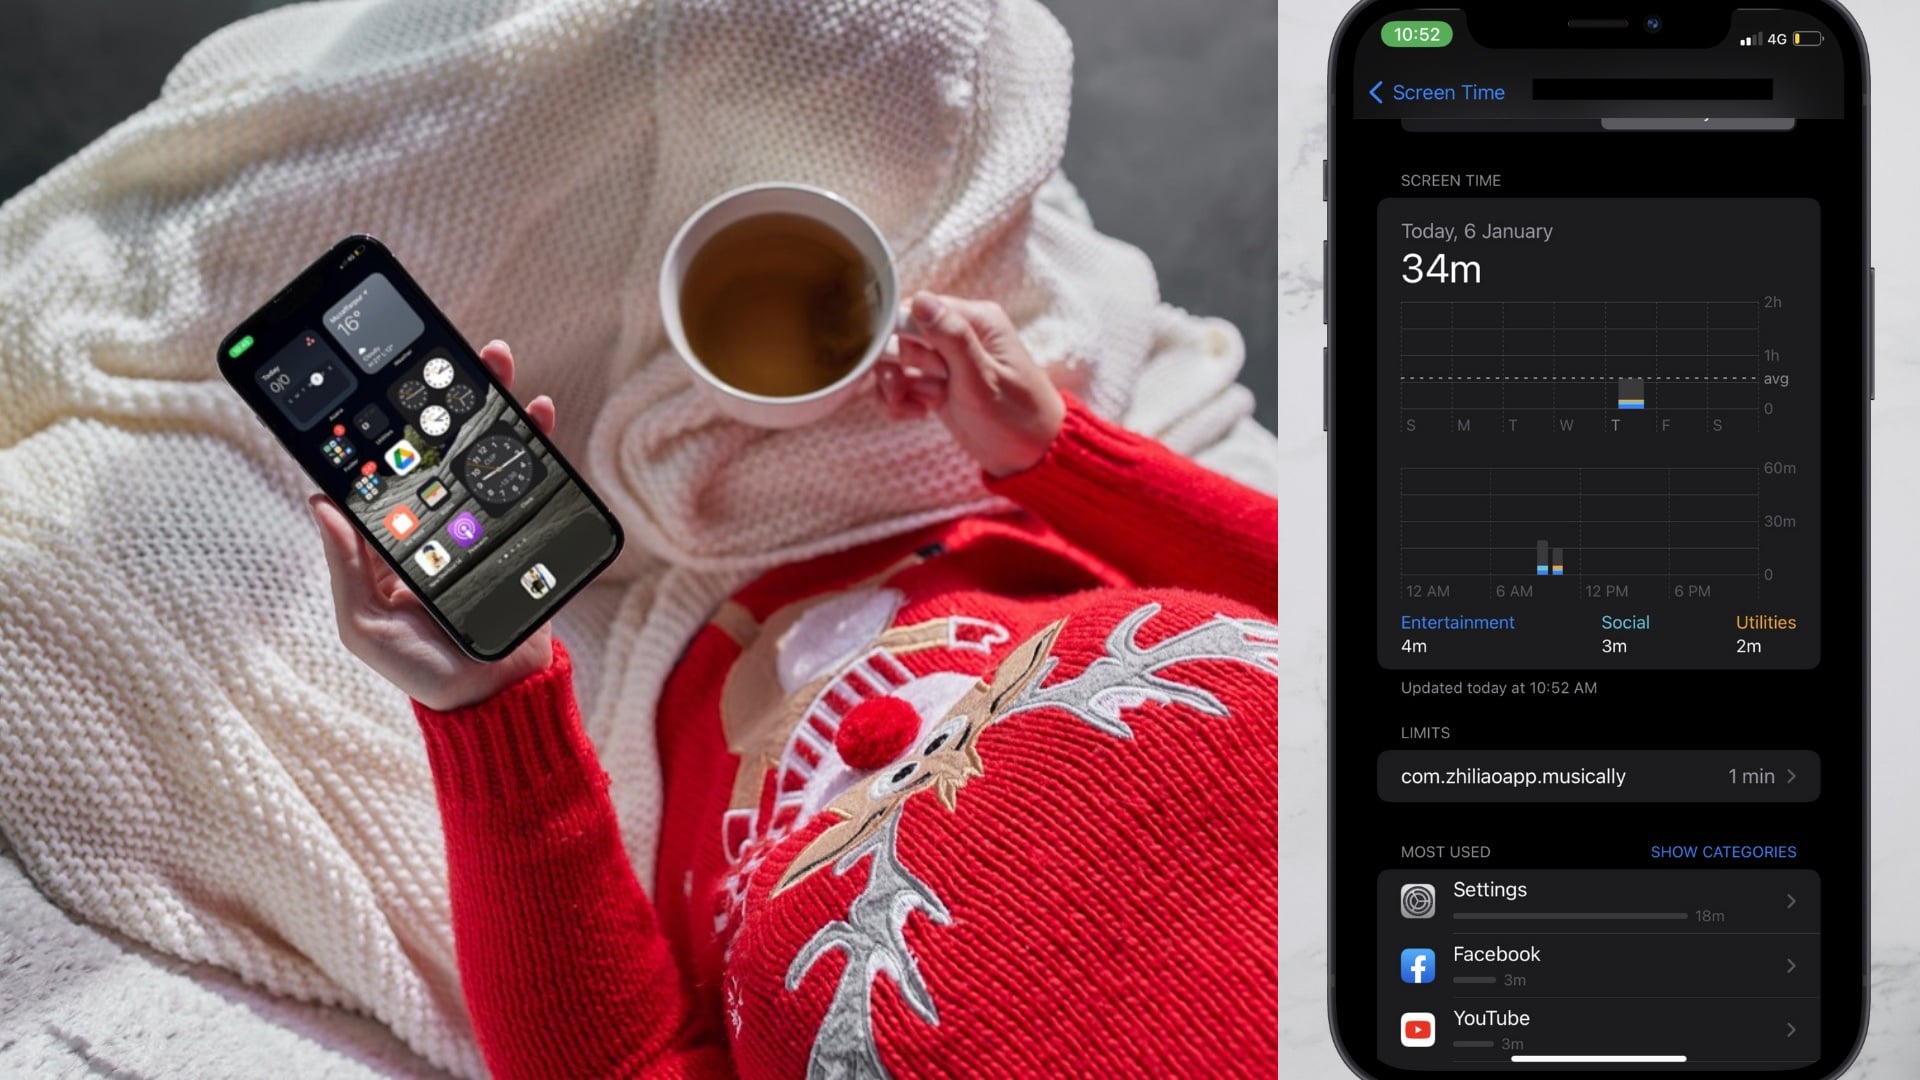
Enhanced parental controls have never been so indispensable before. Whether it’s the brutal trolling on social media or the circulation of obscene images with minimal restriction or the presence of a plethora of shady apps with abusive content, you should never fail to set up parental controls on your iPhone (or, for that matter, any device) to protect your child from falling prey to offensive content. So, how do you get started?
Slowly but steadily, iOS has built a robust parental control feature to let you track your kid’s activity and facilitate a safer messaging and browsing experience. However, if that doesn’t cut it for you, a few proficient parental controls apps make the task more convenient for you. Let’s learn how to use parental controls on iPhone or iPad with that in mind.
Use Downtime to Allow Only Selected Apps on Your iPhone and iPad
When you want your child to concentrate on studies without any distraction, Downtime can have a role to play. With this neat parental control feature, you can allow only selected apps to function on the device.
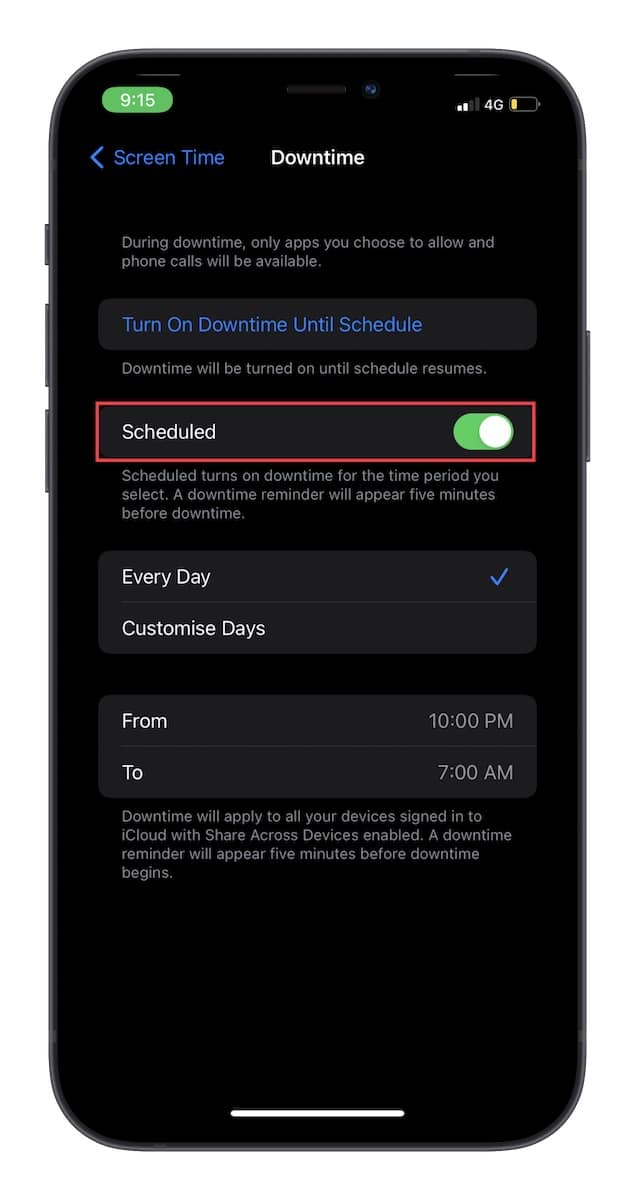
A Downtime reminder appears five minutes before Downtime is enabled. Note that it will apply to all of your devices signed in to the same iCloud account with Share Across Devices enabled.
Step 1: To get going, launch the Settings app on your iPhone or iPad > Screen Time. Make sure Screen Time is turned on. Then, select Downtime.
Step 2: Now, you can choose to turn on Downtime until tomorrow or schedule it as per your need.
Step 3: Simply turn on the toggle next to Scheduled and customize the date and time. It’s important to note that you also have the option to block your iPhone during Downtime.
Allow/Disallow Apps During Downtime on iPhone and iPad
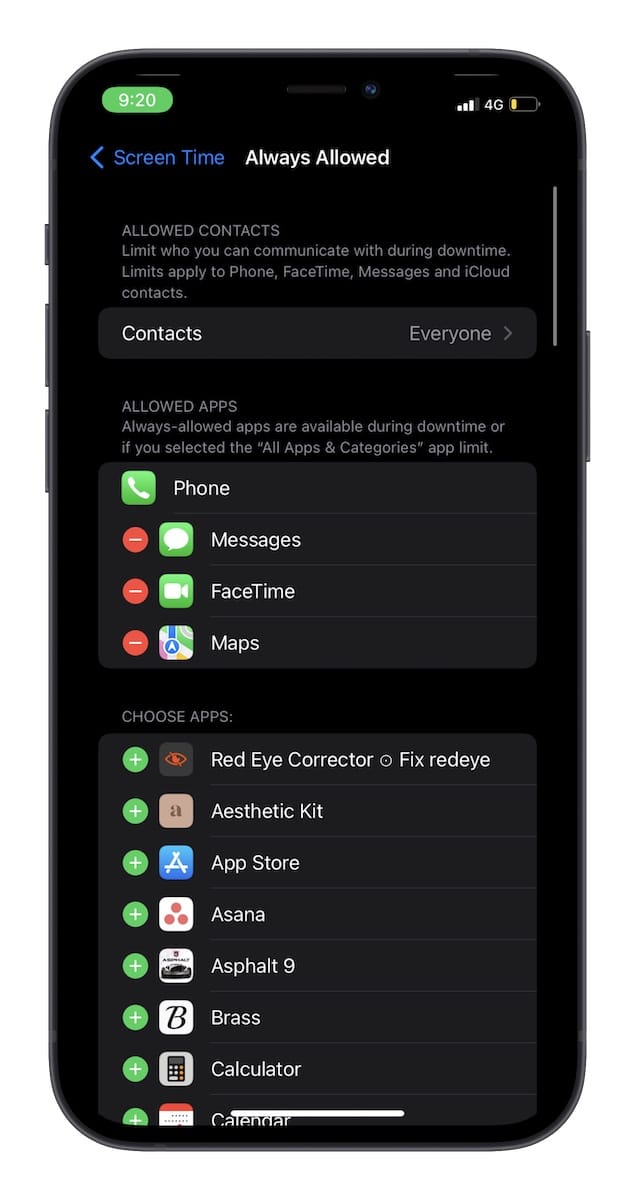
Downtime offers you the desired control over apps. Hence, you can allow or disallow apps on the iPhone conveniently.
Open the Settings app on your iPhone > Screen Time > Always Allowed.
Set Time Limits for Apps on iPhone and iPad
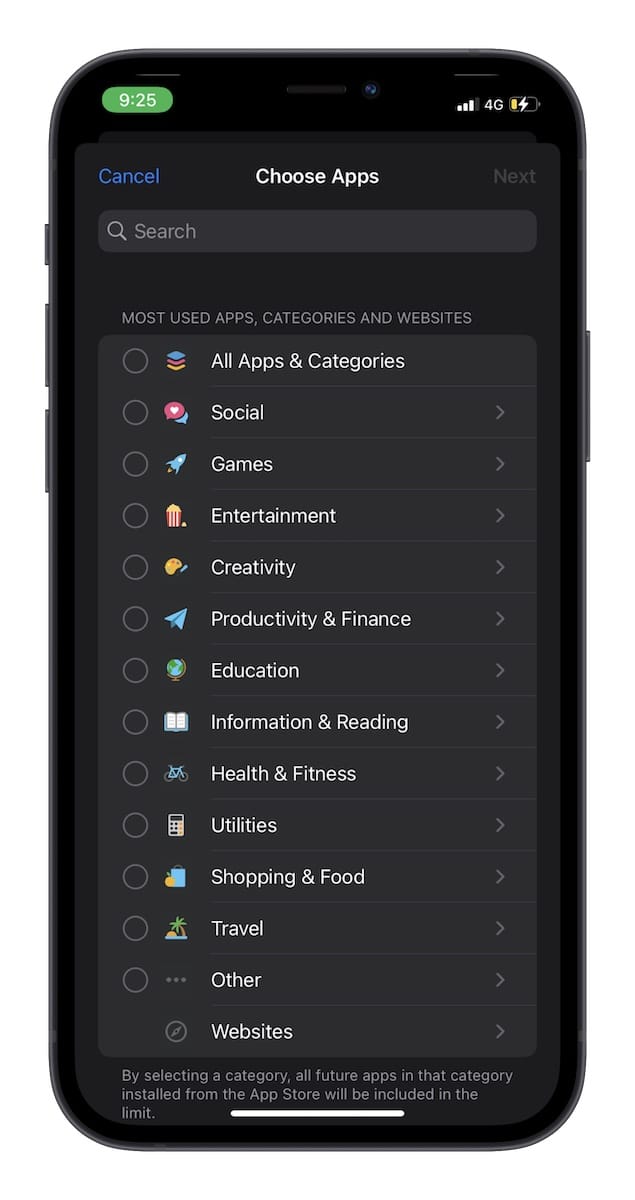
You can set daily time limits for different app categories like social networking, creativity, health and fitness, education, and more. It will help you prevent your child from overusing certain apps.
Step 1: On your iPhone or iPad, open the Settings app on your device > Screen Time > App Limits.
Step 2: Now, tap on App Limit and choose the specific app category. Alternatively, you can also search apps and limit their usage.
Set Communication Limits on iPhone and iPad
Screen Time also lets you set communication limits on your iPhone or iPad. It applies to the Phone app, iCloud contacts, FaceTime, and Messages. It’s worth pointing out that communication to known emergency numbers identified by your network provider is always allowed.
Step 1: On your iPhone or iPad, head into the Settings app > Screen Time > Communication Limits.
Step 2: Now, tap During Screen Time located under the Allowed Communication section and select Contacts Only, Contacts & Groups with at least One Contact, or Everyone.
You can also restrict communication during Downtime and allow/disallow contact editing.

Hide Apps on Your iPhone and iPad
Probably the smartest way to stop your kid from using certain apps is to keep them all under the wraps. This way, you will no longer have to deal with their persistent requests.
Step 1: Open the Settings app on your iPhone or iPad > Screen Time.
Step 2: Tap on Content & Privacy Restrictions and then turn on the toggle next to Content & Privacy Restrictions.
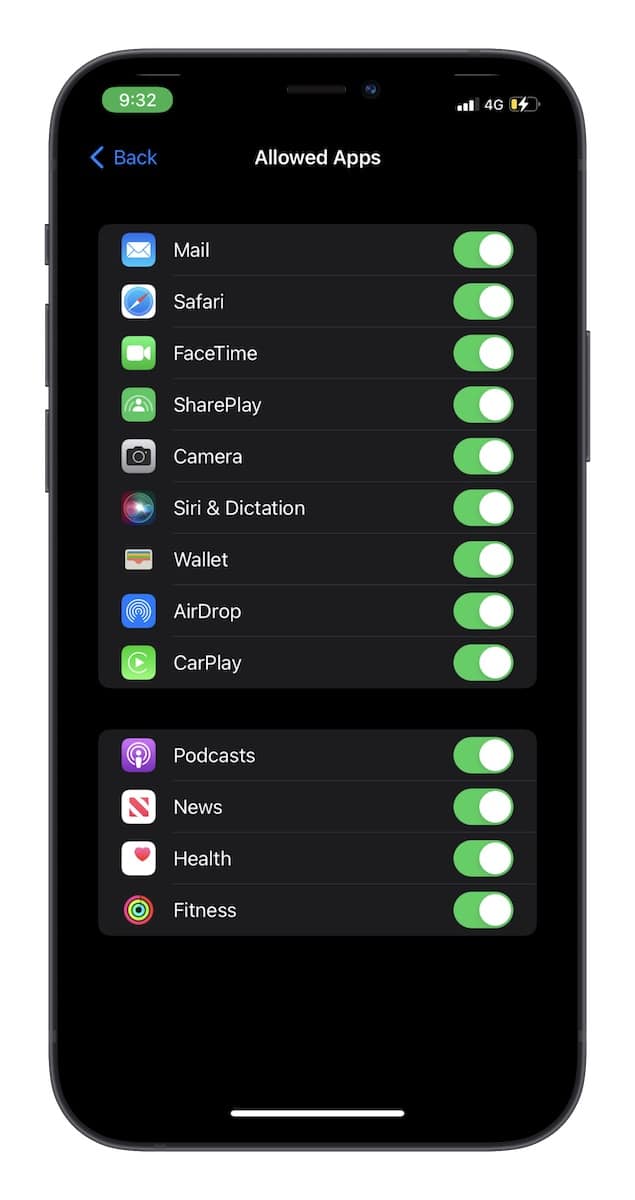
Step 3: Tap on Allowed Apps. On this screen, you should see a long list of built-in apps. Turn off the toggle next to the app that you wish to hide.
Don’t Allow Adult Apps on your iPhone or iPad
If you wish to safeguard your children from adult apps completely, this is worth giving serious consideration.
Step 1: Head over to the Settings app > Screen Time > Content & Privacy Restrictions. Make sure that the toggle for Content & Privacy Restrictions is enabled.
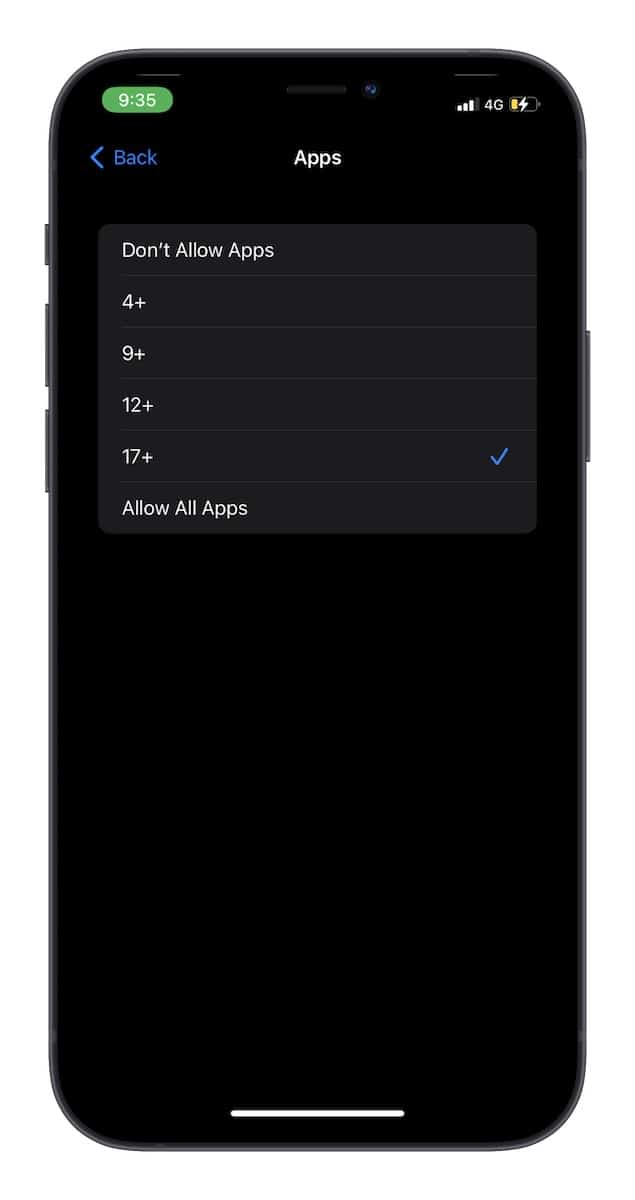
Step 2: Now, tap on Content Restrictions and choose Apps.
Step 3: Next, select a 17+ rating to disallow all apps that are rated for use by adults.
Customize Privacy Settings to Disallow Changes on iPhone and iPad
Whether you are a privacy-conscious person or a concerned parent who wishes to have perfect control over privacy features like location services and microphones, you would appreciate the flexibility to disallow changes to privacy settings.
Step 1: Navigate to the Settings app on your iPhone or iPad > Screen Time > Content & Privacy Restrictions. Now, ensure that the toggle for Content & Privacy Restrictions is turned on.
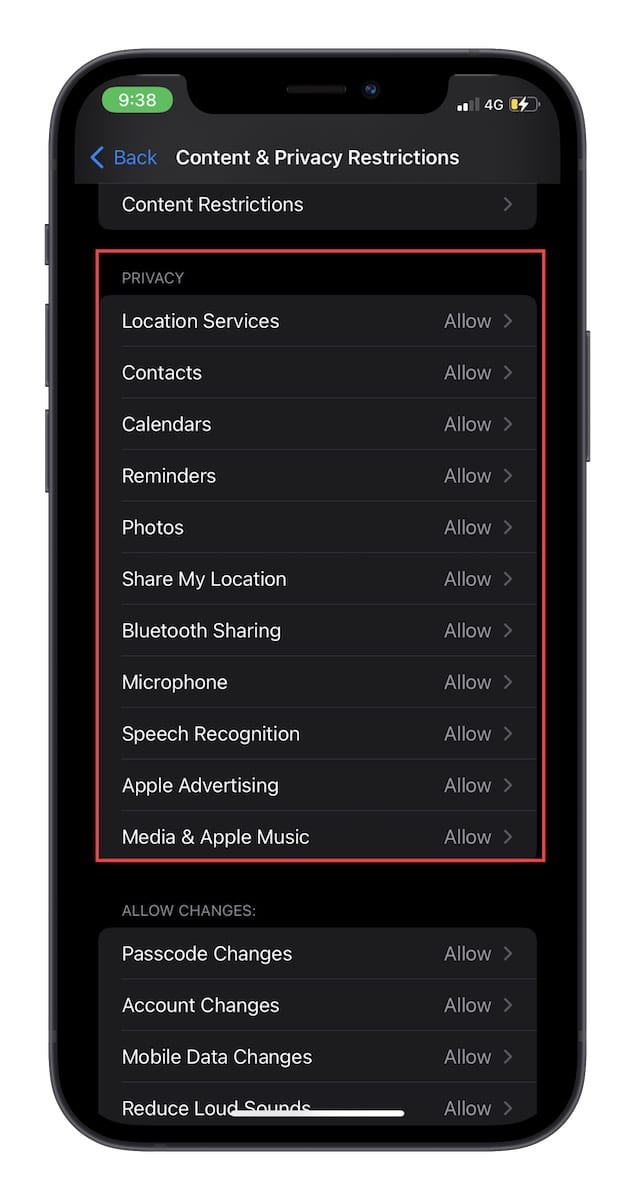
Step 2: Next, scroll down to the Privacy setting and then dive into specific categories such as Location, Contacts, Calendars, Reminders, Photos, Share My Location, Bluetooth Sharing, Microphone, Speech Recognition, Apple Advertising, and Media & Apple Music and then allow or disallow changes depending on your needs.
Restrict App Store Purchases on iPhone and iPad
To ensure your child doesn’t make unsolicited in-app purchases and install or delete apps without permission, make sure to restrict App Store purchases on your iPhone or iPad.
Step 1: Navigate to the Settings app on your iPhone or iPad > Screen Time > Content and Privacy Restrictions. Now, ensure that the toggle for Content and Privacy Restrictions is turned on.
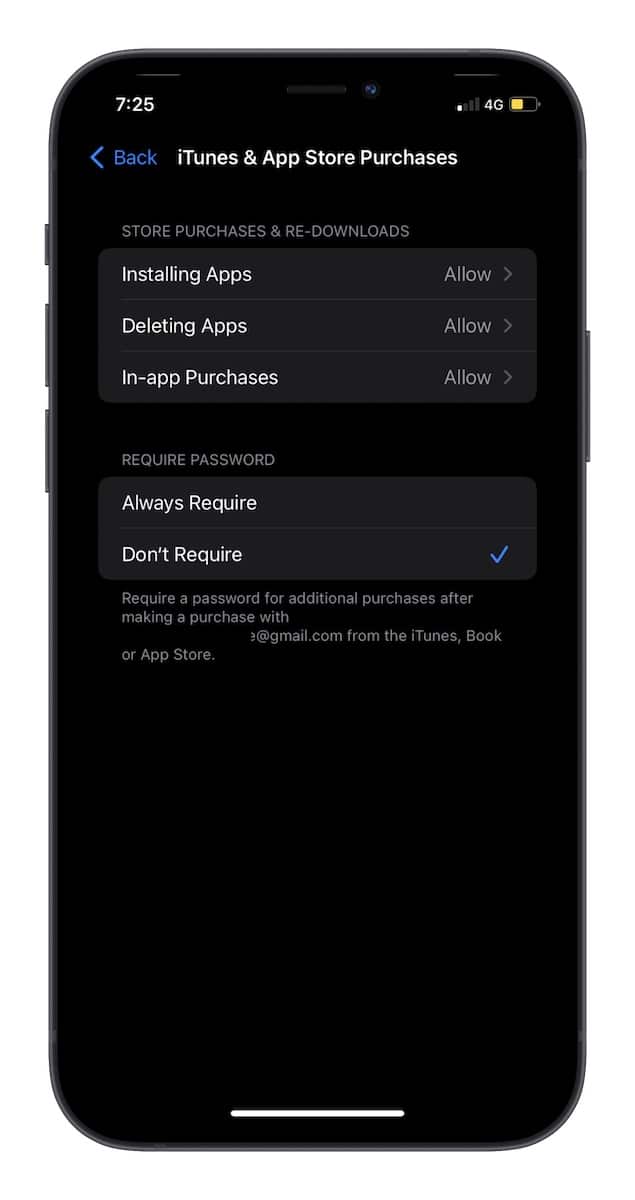
Step 2. Next, tap on iTunes & App Store Purchases. Then, you can allow or disallow installing apps, deleting apps, in-app purchases, and make passwords mandatory for installing apps.
Restrict Adult Websites on iPhone and iPad
iOS offers a highly efficient way to block adult websites. So, you should take advantage of this feature to ensure your child has a safe browsing experience.
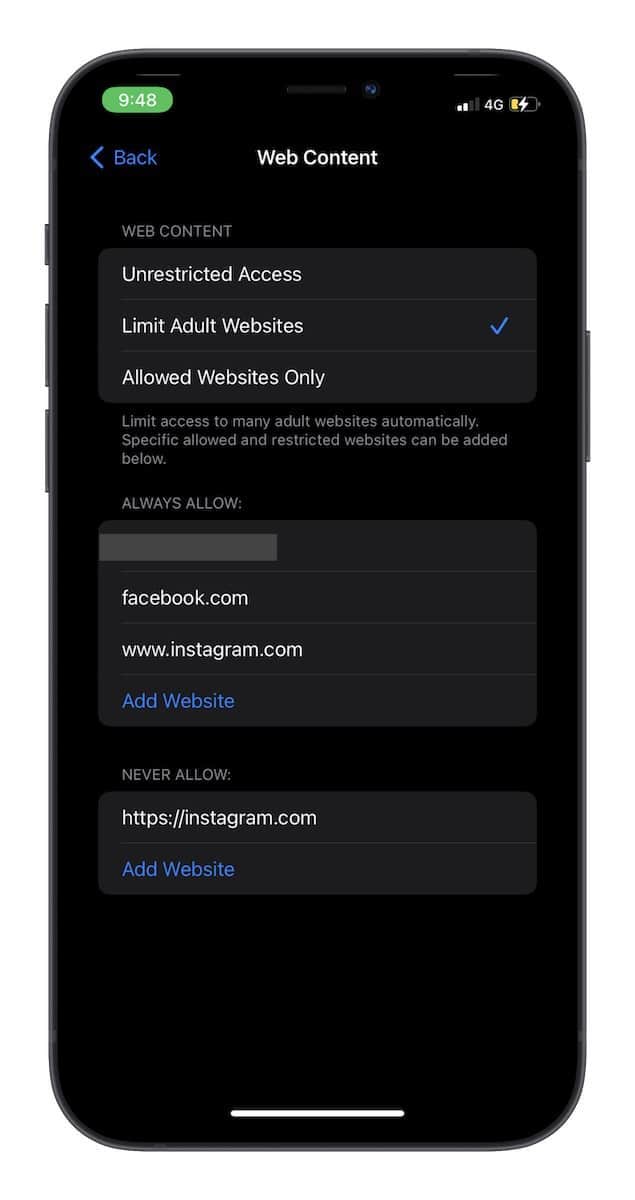
Step 1: Open the Settings app > Screen Time > Content & Privacy Retrictions > Content Restrictions.
Step 2: Now, tap on Web Content and choose Limit Adult Websites.
Step 3: If you want to be doubly sure, you can add specific websites to the blocklist. Under the Never Allow section, tap Add Website and enter the link of the website you wish to block.
In the future, Safari and other supported browsers, including Google Chrome, will block the websites whenever anyone tries to open them.
Disable Vulgarity for Siri on iPhone and iPad
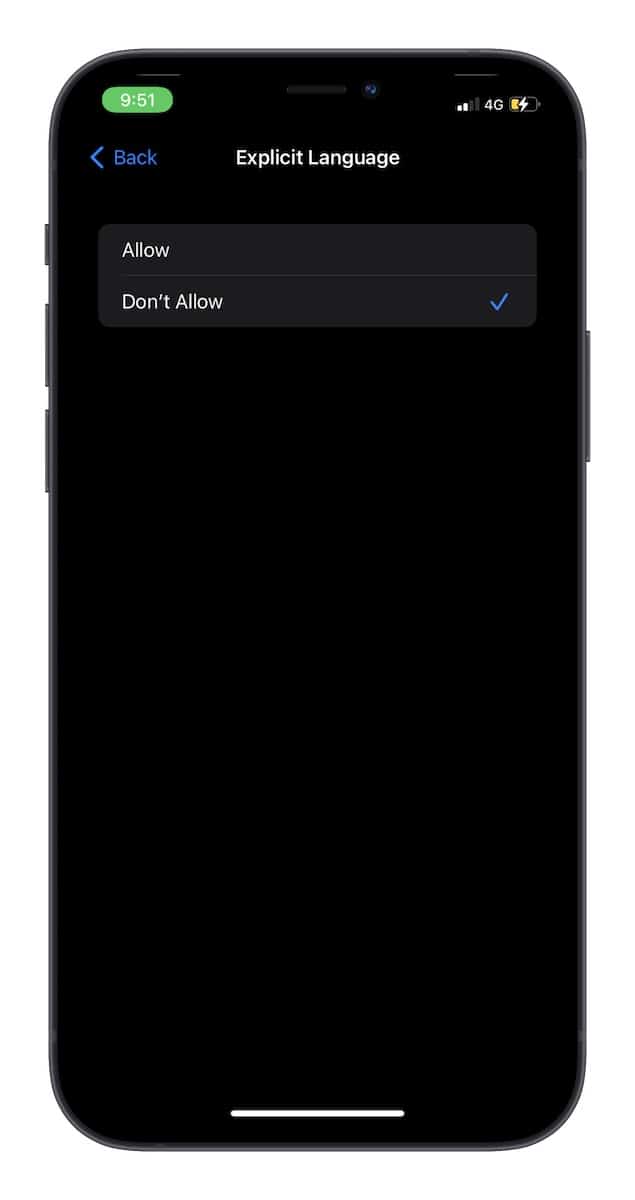
While there is no denying the fact that Siri is a pretty handy virtual assistant, you should make sure it keeps explicit language at bay, especially when interacting with children.
Step 1: Dive into the Settings app on your device > Screen Time > Content & Privacy Restrictions > Content Restrictions.
Step 2: Under the Siri section, tap Explicit Language and choose Don’t Allow.
Restrict Explicit Apple Music content, Movies, TV Shows, Books, and App Clips on iPhone and iPad
If you are still looking for ways to keep explicit content off-limits, I recommend restricting Apple Music, Movies, TV Shows, and Books from showing or playing obscene content.
Step 1: Open the Settings app on your iPhone or iPad > Screen Time > Content & Privacy Restrictions > Content Restrictions.
Step 2: Under the Allowed Store Content section, head to the respective categories such as Music, Music Videos, Music Profiles, Movies, TV Shows, Books, and App Clips, and then customize the setting in line with your preference.

Use Screen Time to Restrict Game Center
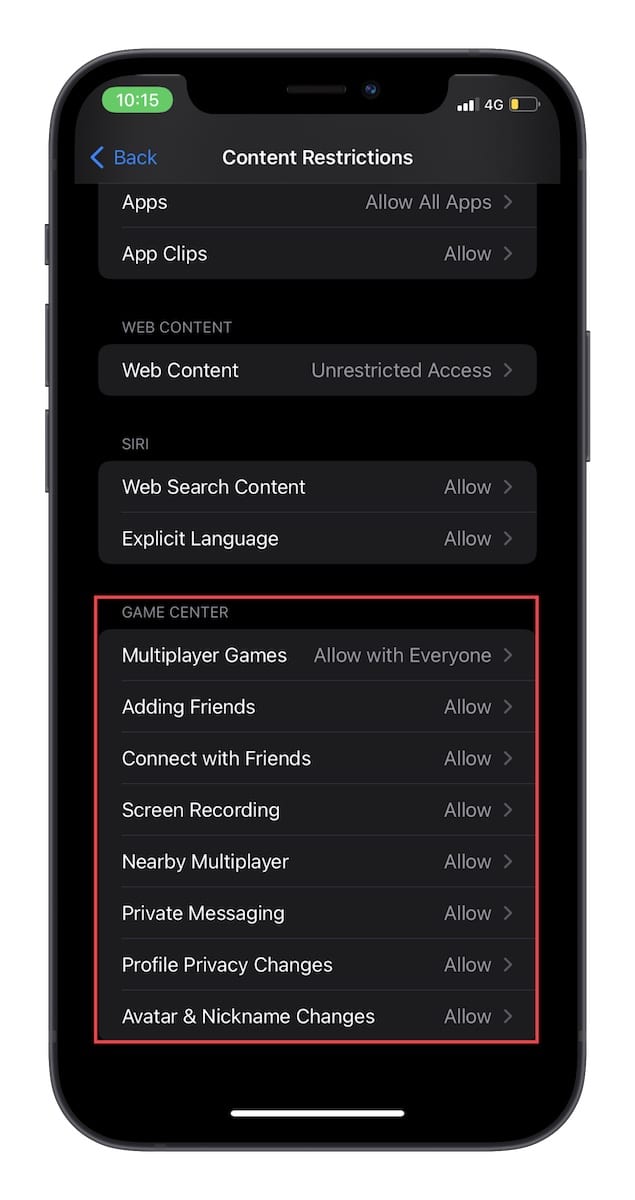
If you no longer want your children to add friends, play multiplayer games with strangers on the internet, or indulge in private messaging while playing, fine-tune the game center settings.
Step 1: Open the Settings app on your iPhone or iPad > Screen Time > Content & Privacy Restrictions > Content Restrictions.
Step 2: Now, scroll down to the Game Center setting and fine-tune each option according to your preference.
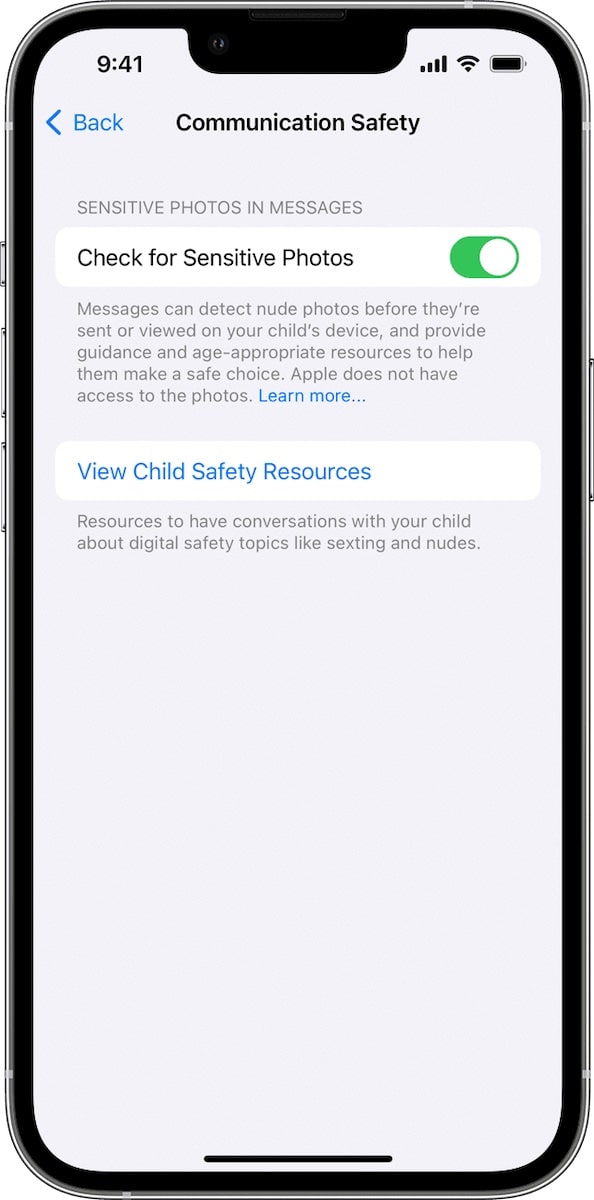
How to Use New Communication Safety Feature for Kids on iPhone and iPad
Even before Apple rolled out the new Communication Safety feature for kids in iOS 15.2, it drew flak for its plan to scan iCloud images for child sexual abuse material (CSAM).
When the widespread fear seemed to derail the feature, Apple came out with a detailed explanation asserting that it does not have access to any of the photos in Messages. The tech giant further added that the entire process is done on-device to verify if an image has nudity and the messages remain end-to-end encrypted.
If Messages find that a child receives or attempts to send obscene images, it automatically blurs the photos before they are viewed on your child’s device. Besides, it also offers the needed guidance to help your child steer clear of offensive images.
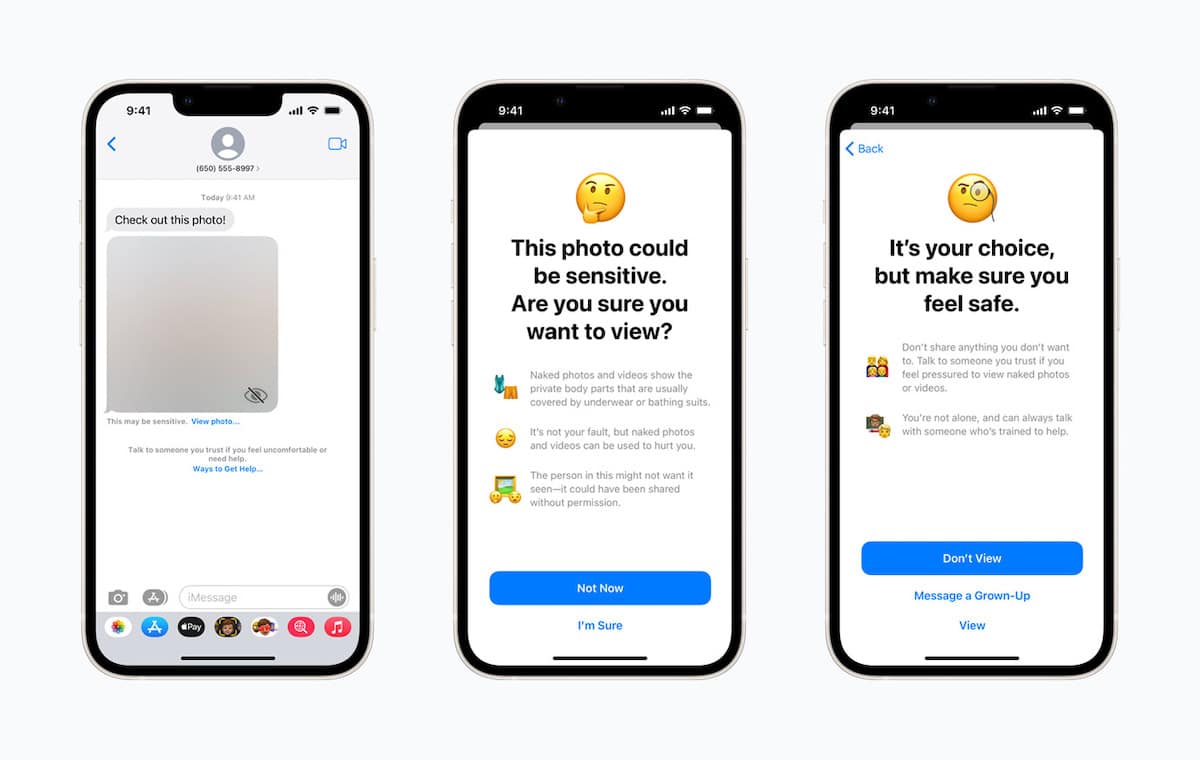
If you want to use this optional tool to help your child stay safe when texting, make sure Family Sharing is enabled on your device. Also, ensure that your iPhones, iPads, and Macs are running iOS 15.2 or later, iPadOS 15.2 or later, and macOS 12.2 or higher, respectively.
Step 1: Open the Settings app > Screen Time.
Step 2: Now, scroll down and select the child you’d like to set up the Messages safety for.
Step 3: Tap on Communication Safety and then turn on the toggle next to Check for Sensitive Photos.
Use Guided Access to Force Your Child to Stay Inside a Specific App
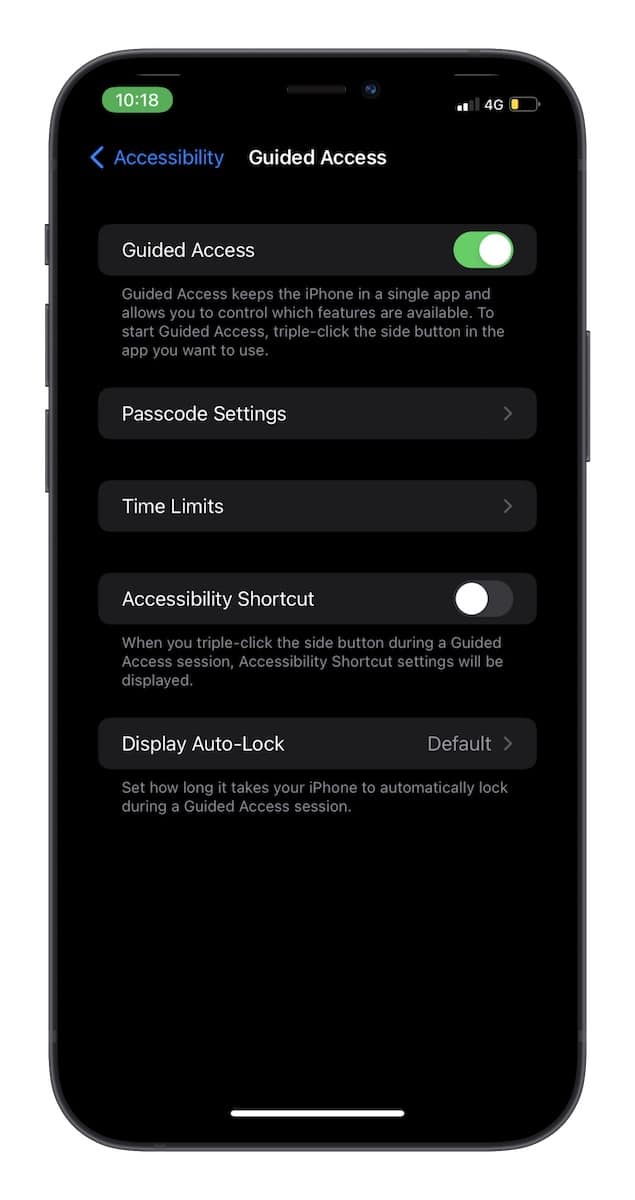
Guided Access has long been a notable accessibility feature that you can use to force your kid to remain inside a specific app and allow only particular features to be available. This is precisely what you need to limit your child’s activities on the iPhone/iPad. It is also perfect for when you are dealing with a toddler.
Step 1: Open the Settings app on your iPhone or iPad > Accessibility > Guided Access.
Step 2: Now, adjust the passcode setting, time limits, and the display auto-lock. Once you have customized the settings, you can bring the Guided Access into effect by triple-clicking the side/Home button.
Best Parental Control Apps for iPhone and iPad
Screen Time and Guided Access would likely live up to your expectations. However, if you are exploring more viable options, third-party parental control apps have got you fully covered.
OurPact
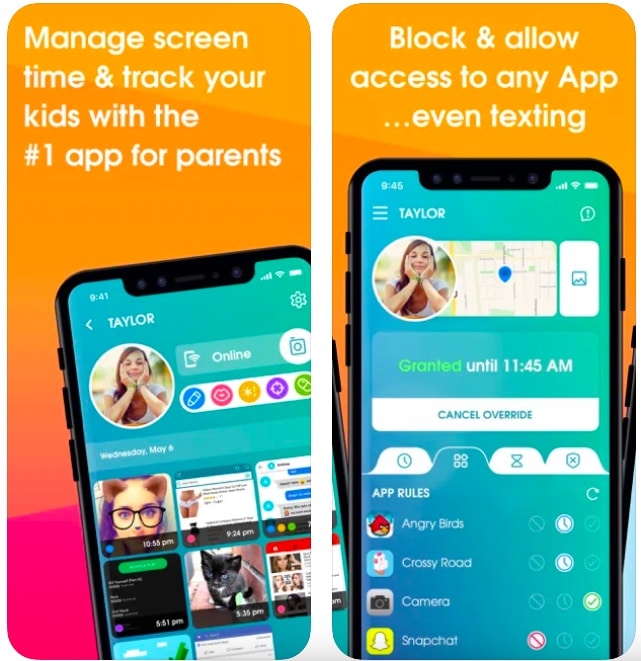
If you have set your sights on a complete parental control app for your iPhone or iPad, you would be hard-pressed to find a better option than OurPact. From letting you block shady websites to tracking the location of your children to set up much stricter app rules, it checks all the boxes.
➤ Download: OurPact
FemiSafe
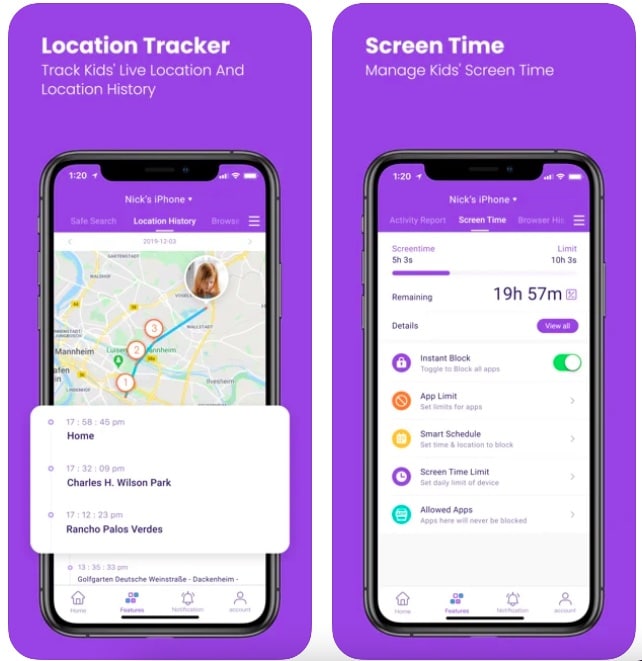
FemiSafe is feature-rich and comes with a wide range of tools to let you restrict your kid’s device usage and keep an eye on every subtle activity with an intuitive tracking system. What caught my eye in this app is the proficient website filtering designed for a safe browsing experience. Besides, the ability to track phone activity remotely is also noteworthy. Though the $10/month price tag makes it appear a touch exorbitant, you can’t go wrong with the features you get in return.
➤ Download: FemiSafe
Kidslox
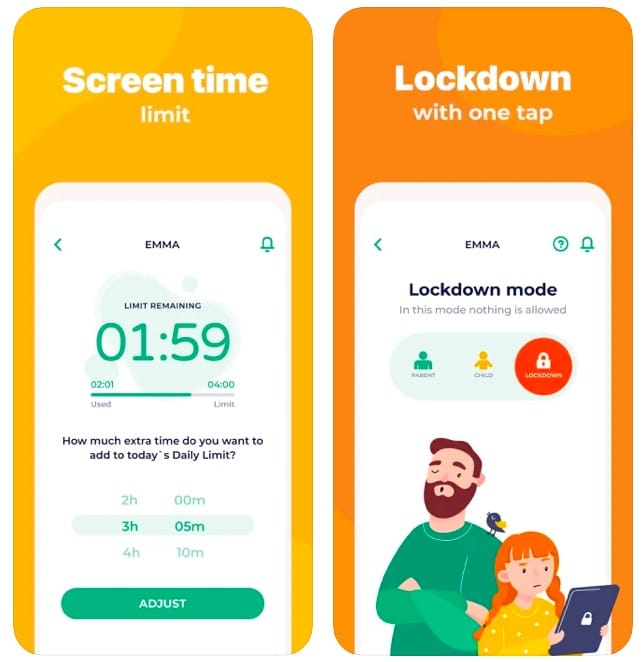
Kidslox is what you should pick to block all unwanted apps, restrict internet access, and filter web content easily. It has a clean interface and works reliably to offer you the required parental control. The feature that impressed me was the lockdown mode. It allows you to bring all activity on the device to a grinding halt with just a quick tap.
➤ Download: Kidslox
There you have it! So, that’s how you can enable and use parental controls on your iPhone or iPad. In most cases, you won’t need to look beyond Screen Time. However, if you ever find the built-in parental control lacking flexibility or customization, the above-mentioned third-party apps are always there to fill in the void.


0 Comments