Iphone Tips and Tricks | Iphone tips | Iphone Tips and Tricks 2022/2021
Got yourself a new iPhone 13 or iPhone 13 Pro and now looking to transfer data from your old iPhone? Unlike Android, Apple has made it extremely easy to transfer your data from an old iPhone to your shiny new iPhone. Read this guide to know how you can transfer and import data from your old iPhone to the iPhone 13.
Apple offers three different methods to transfer data from your old iPhone to a new one: iCloud, iTunes, and Quick Start — which was formerly known as Migration Utility.
iCloud relies on creating an iCloud backup of your iPhone and then restoring it during setup on the new iPhone. The second one relies on connecting your old iPhone to a PC running iTunes, creating a backup, and then restoring it on a new iPhone. Quick Start is the best option as it makes the entire process a breeze and is the most convenient of the lot.
The iCloud backup method requires that you have access to a fast Wi-Fi connection. Even otherwise, this can take a long time. The iTunes method does not have any such limitation but it requires access to a PC. The advantage of the iTunes and iCloud method is that they do not require you to have access to your old iPhone while setting up your new iPhone. You can create a backup before selling the device and then restore it on your new iPhone 13 Pro or iPhone 13 when you get it.
With Quick Start, you must have access to your old iPhone during the transfer process.
Transfer Data from Old iPhone to iPhone 13 or iPhone 13 Pro
- You start the migration process by simply bringing your old iPhone near your new iPhone. Make sure that Bluetooth is enabled on both devices.
- While the process can be done wirelessly, one can also use a Lightning cable along with an appropriate adapter to transfer data over a wired connection.
- You will have to use the same Apple ID on your new iPhone as your old iPhone.
- Depending on the amount of data to be transferred, the entire process can easily take an hour or two.
- Apart from transferring your data, you have the option of transferring your system settings as well.
- You will also be prompted to select if you would like to automatically pair your Apple Watch with the new iPhone.
- All apps will be downloaded from the App Store so you will need an active (and speedy) internet connection during the process.
Step 1: Bring Both iPhones Close to Each Other
With your new iPhone at the setup process, bring the old iPhone close to it. This will bring up the Quick Start pop-up on your old iPhone. Tap Continue on the pop-up and confirm your identity using Touch ID or Face ID.
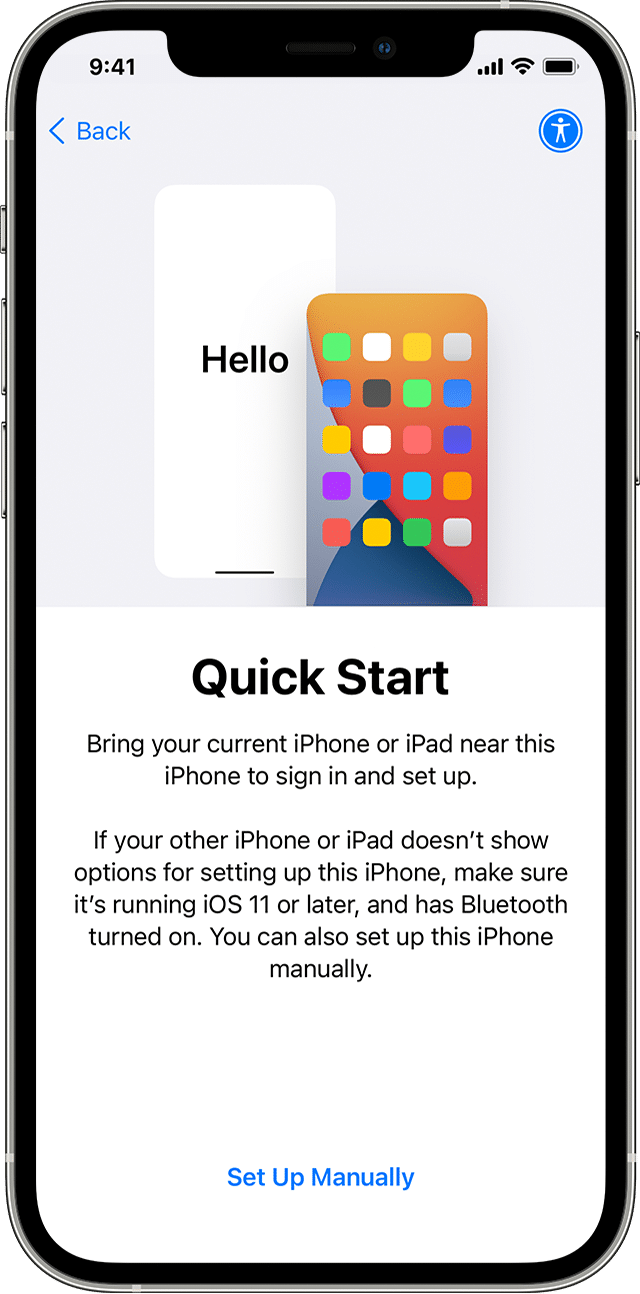
Step 2: Scan the Animation on Your New iPhone from Your Old iPhone
To pair both phones, you will have to scan the object being displayed on your new iPhone using your old phone. In case the camera on your old iPhone is not working, you can use the Authenticate Manually option. This will help complete the pairing process.
Step 3: Set up Face ID on Your New iPhone
Enter the passcode of your old iPhone on your new iPhone. After a minute, you will be prompted to set up a Face ID on your new device.
Step 4: Decide How You Want to Transfer Data
Once you are done setting up Face ID, you will get an option to transfer data from your old iPhone or use iCloud to restore an old backup. Both options will display the amount of time required for the entire process to complete.

You have to select the Transfer from iPhone option. Use Other Options at the bottom if you want to transfer data between your old and new iPhone over a wired connection.
Step 5: Proceed with the Setup Process
Continue with the setup process where you will have to accept a few terms and conditions. After that, the actual data transfer process will start which can take anywhere between a few minutes to an hour or two depending on the amount of data you have on the old iPhone.
Unpair Apple Watch
If you have an Apple Watch and you’re planning to move content to your new iPhone, then you need to unpair your Apple Watch from your current iPhone first.
This will automatically backup your watch. Your Apple Watch is also automatically backed up every time you back up your iPhone to iTunes or iCloud.
Set up Another Device for 2-Step Verification
Apple makes it mandatory to enable 2FA (two-factor authentication) for your Apple account. And your old iPhone is already set as the primary device for 2-step verification. It is advisable to set up another trusted device. This will allow you to verify your Apple ID while setting up your new iPhone.
You can then transfer the data from your old iPhone to the new iPhone 13 using iTunes or iCloud by following the instructions below.
How to Transfer Data from Old iPhone to iPhone 13 or iPhone 13 Pro Using iTunes
- Ensure that you’ve installed the latest version of iTunes. You can update it via Software Update or download it from Apple’s website.
- Connect your iPhone to a computer with the latest version of iTunes installed.
- Select your old iPhone in iTunes under Devices.
- Click on File > Devices > Transfer Purchases to save content you’ve download from the iTunes Store or App Store.
- If you also want to transfer passwords, health, and activity data to your new iPhone then you’ll need to encrypt iPhone backup. This will backup your keychain information, which includes email account passwords, Wi-Fi passwords, and passwords you enter into websites along with health and activity data. Select the box called Encrypt [device] backup and select a password. Do not forget this password as then you will not be able to restore the backup on your iPhone.
- Click Back Up Now.
- To make sure the backup was successful, go to iTunes Preferences > Devices. You should see the name of your old iPhone along with the date and time of the latest backup.
Now you can transfer your iTunes backup to your new iPhone 13 or iPhone 13 Pro.
Step 1: Turn on your new iPhone 13 or iPhone 13 Pro. Proceed to follow the on-screen instructions.
Step 2: When prompted to Set Up iPhone, tap on Restore from iTunes Backup.
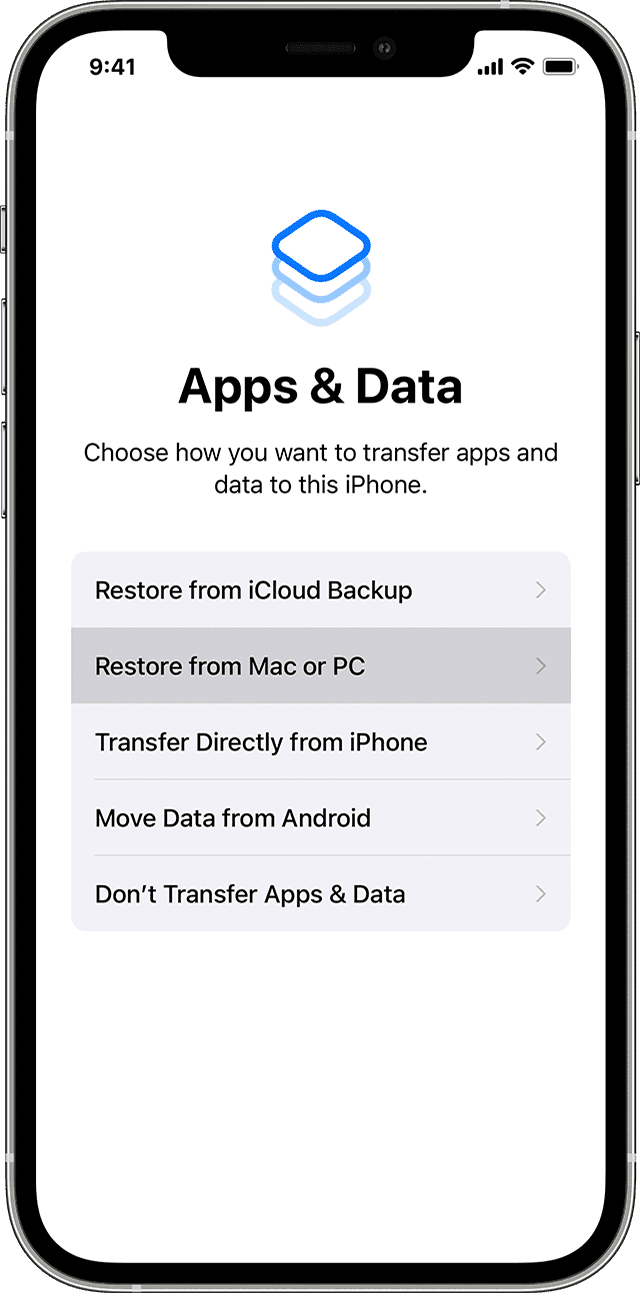
Step 3: Now connect your new iPhone to iTunes (on the same computer you used to back up your old iPhone).
Step 4: iTunes will ask you to restore from backup or set up as new. Select the backup of your old device and choose Continue (Ensure that iTunes is showing you the latest backup of your old iPhone). Please note that restoring from the backup can be a time-consuming process and depends on the size of the backup and on the speed of your Internet connection.
Step 5: When the restore process is complete, your new iPhone will restart. Then it will be ready for use. You should keep your new iPhone connected to iTunes to sync data not contained in the backup (such as music, videos, apps, and so on).
Step 6: You can verify and change which data are synced by clicking the syncing tabs in iTunes.
Step 7: If you haven’t encrypted your iPhone backup, then you will also need to enter your password for your Apple ID, email, other accounts, and voicemail again. The passwords are not restored to a new device due to security reasons.
Backup Your Old iPhone Using iCloud
- iCloud backs up your device once a day. But it is good practice to backup your old device to iCloud one last time before migrating so nothing is missed out. Launch the Settings app and navigate to iCloud > Backup and tap Back Up Now. This may take time depending on the amount of data to be backed up.
- After the backup is complete, check the Last Backup time (should show current time) to ensure that your backup was successful.
- Now turn off your old iPhone.
Now you can transfer your iCloud backup to your iPhone 13 or iPhone 13 Pro.
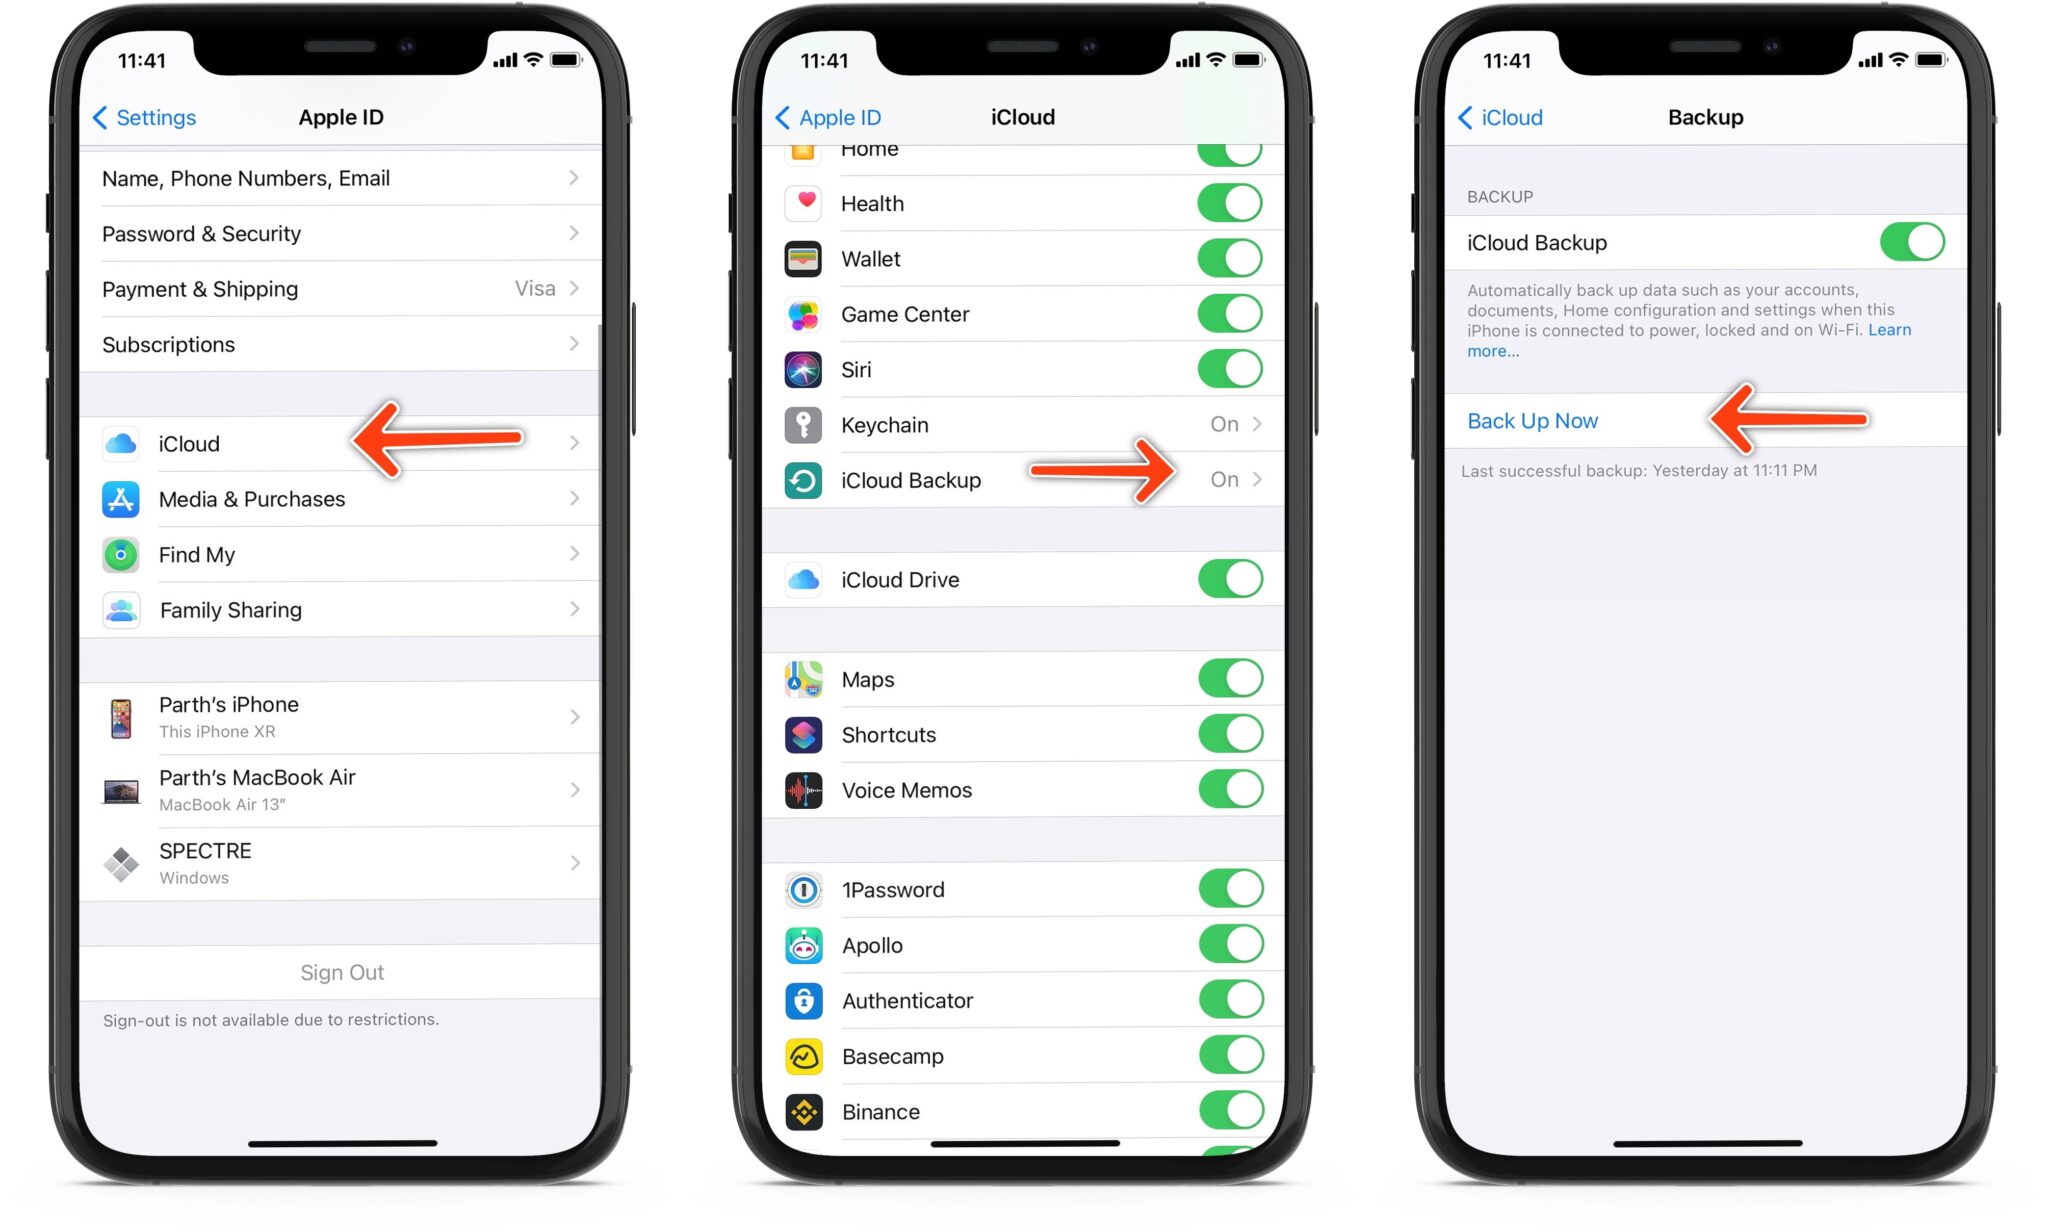
Transfer iCloud Backup to iPhone 13 or iPhone 13 Pro
Step 1: Turn on your new iPhone 13 or iPhone 13 Pro. Follow the on-screen instructions to complete the setup assistant by selecting your language and country, and choose whether to enable Location Services. When prompted, choose your Wi-Fi network.
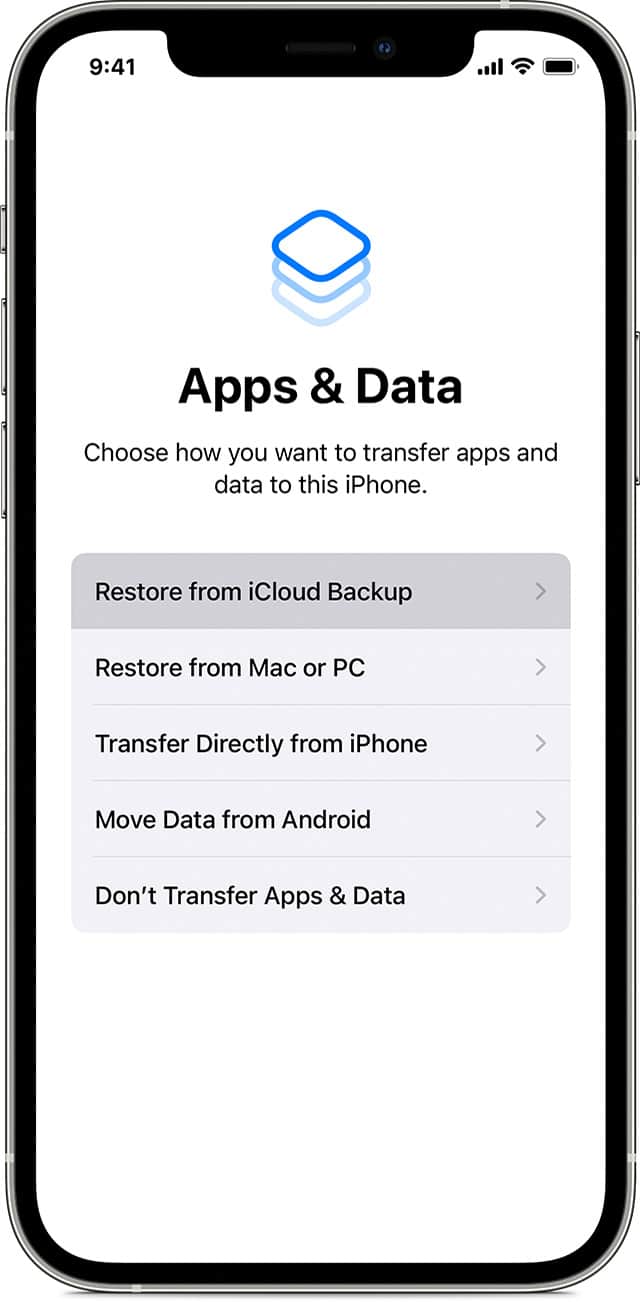
Step 2: When prompted to Set Up iPhone, tap on Restore from iCloud Backup.
Step 3: Enter your Apple ID and password, and tap Next at the top right corner.
Step 4: It will prompt you to agree to the terms and conditions. Tap on Agree in the bottom right corner.
Step 5: You will now see a list of backups. Select the latest backup of your old device and tap Restore. Wait until the device has finished restoring from the backup. Please note that it can be a time-consuming process and depends on the amount of data contained in the backup and on the speed of your Internet connection.
Step 6: When the restore process is complete, your iPhone will restart. Then it will be ready for use. You should also connect the device to iTunes to sync data not contained in the backup (such as music, videos, apps, and so on).
Step 7: Your iPhone 13 will also start re-downloading all your apps in the background.
Step 8: You will also need to enter your password for your Apple ID, email, other accounts, and voicemail again. The passwords are not restored to a new device for security reasons.
You should now be able to use your shiny new iPhone 13 mini, iPhone 13, iPhone 13 Pro, or iPhone 13 Pro Max. After the data has been restored, you can erase all the content and settings from your old iPhone.
It is advisable to keep your iPhone 13 connected to Wi-Fi and plugged into a power source until the data from iCloud is downloaded to your device. The data is downloaded automatically in the background.


0 Comments